Host a world (advanced)
This guide is currently the only way to host a Tivoli world.
You will need:
- a little bit of knowledge of how Docker works
- a machine with any distribution of Linux 64 bit, x86_64 or arm64v8
1. Install Docker and Docker Compose
If you're using Ubuntu (from the official docs Docker and Docker Compose):
sudo apt-get update -y
sudo apt-get install -y curl python3-pip libffi-dev
# docker
curl -fsSL https://get.docker.com -o get-docker.sh
sudo sh get-docker.sh
# docker compose
sudo pip3 install docker-compose
# start system service
sudo systemctl enable docker
sudo systemctl start docker
# add user to group
sudo usermod -aG docker $USER
Or if you're using Arch Linux:
sudo pacman -Sy docker docker-compose
sudo systemctl enable docker
sudo systemctl start docker
sudo usermod -aG docker $USER
You will have to log out so that your current user is part of the docker group.
Run docker system info to verify if it's running and installed.
If you're using another distro, look here:
- Docker: https://docs.docker.com/install
- Docker Compose: https://docs.docker.com/compose/install
You will find plenty of guides on Google too.
2. Structuring your configuration
You will need to create a folder where all your world(s) will live. This is entirely portable so it's easy to backup or migrate.
mkdir worlds
cd worlds
Write a new file inside the folder using your favorite text editor:
docker-compose.yml
version: "3.6"
services:
    # remove this service to disable auto updating
    watchtower:
        image: containrrr/watchtower:latest
        restart: always
        labels:
            - com.centurylinklabs.watchtower.scope=tivoli-server
        environment:
            # check for updates at 4 am every day
            - WATCHTOWER_SCHEDULE=0 0 4 * * *
            - WATCHTOWER_CLEANUP=true
        volumes:
            - /var/run/docker.sock:/var/run/docker.sock
            - /etc/localtime:/etc/localtime:ro

    my-world:
        image: registry.tivolicloud.com/tivolicloud/interface/server:latest
        network_mode: host
        restart: always
        logging:
            driver: none
        labels:
            - com.centurylinklabs.watchtower.scope=tivoli-server
        volumes:
            - ./my-world:/root/.local/share/Tivoli Cloud VR
        environment:
            - HIFI_DOMAIN_SERVER_HTTP_PORT=40100
            - HIFI_DOMAIN_SERVER_HTTPS_PORT=40101
            - HIFI_DOMAIN_SERVER_PORT=40102
            - HIFI_DOMAIN_SERVER_DTLS_PORT=40103

            - HIFI_ASSIGNMENT_CLIENT_AUDIO_MIXER_PORT=48000
            - HIFI_ASSIGNMENT_CLIENT_AVATAR_MIXER_PORT=48001
            - HIFI_ASSIGNMENT_CLIENT_ASSET_SERVER_PORT=48003
            - HIFI_ASSIGNMENT_CLIENT_MESSAGES_MIXER_PORT=48004
            - HIFI_ASSIGNMENT_CLIENT_ENTITY_SCRIPT_SERVER_PORT=48005
            - HIFI_ASSIGNMENT_CLIENT_ENTITIES_SERVER_PORT=48006
Rename every instance of my-world with the name of your world.
volumes:
    - ./my-world:/root/.local/share/Tivoli Cloud VR
This part of the config explains that Docker should mount the folder my-world inside of your working folder to the server configuration files.
Please make sure there's only one volume mounted per server. This folder must be kept safe.
Auto updating
At the top of the docker-compose.yml file, you'll see a service named watchtower. It's responsible for auto updating your worlds.
For each world service running, you'll find a label named com.centurylinklabs.watchtower.scope=tivoli-server, which indicates that it should be registered with watchtower in order to get checked for updates.
If you'd like to completely remove auto updating, remove the watchtower service and labels attached to each world:
labels:
    - com.centurylinklabs.watchtower.scope=tivoli-server
Feel free to duplicate the service for as many worlds as you want. However, remember that the server software can be heavy to run if there are many people connected.
If you add more than one server, you must update the port numbers defined in the environment array. Usually we go up in increments of 10 but you can set them to whatever you like.
3. Starting, restarting, stopping and updating
Docker Compose is really awesome for running Docker containers. This is all super easy.
Make sure you're inside the folder where docker-compose.yml is and you can run:
docker-compose up -dstarts all servers and syncs yourdocker-compose.ymlconfig.docker-compose downstops all servers, gracefully.docker-compose pullchecks if there's a new version and downloads it.- Run
up -dafter and all your servers will update to the new version.
- Run
docker-compose restart/stop/start my-worldwill restart, stop or start a server.docker-compose logs -fshows the logs for all servers.
There are some Docker commands you might want to know as well:
docker imagesshows all downloaded images on your machine. These can be big!docker rmiremoves an image such as an old version of Tivoli server.docker psshows all running docker containers.
Check the servers' logs and if there are no errors, it's running!
If you want to update your servers, run these commands:
docker-compose pull
docker-compose up -d
4. Connecting your server to a Tivoli world
This part is a little messy and that will change. We're still in alpha and have major redesigning to do from the old server admin panel.
- Open your web browser and visit: http://localhost:40100
-
Step 1 of 2:
- Click "Connect your Tivoli Cloud World" and you will be redirected to your worlds.
- Click "Create new world" and fill as much as you can.
- Once your world has been created, click "Generate new access token" and copy the token.
- This is a secret key that binds your server to your world. You can revoke it at any time by generating a new token.
- Go back to your server web page and paste the token. Click "OK".
-
Step 2 of 2:
- Add the usernames of the people who you want to give full permissions to.
- Who can join and create:
- None: Nobody will have access. Will make your world private.
- Friends: Your friends from the account you connected the server with.
- Everyone logged in: Securely available to everyone.
-
Linking the server correctly with the world:
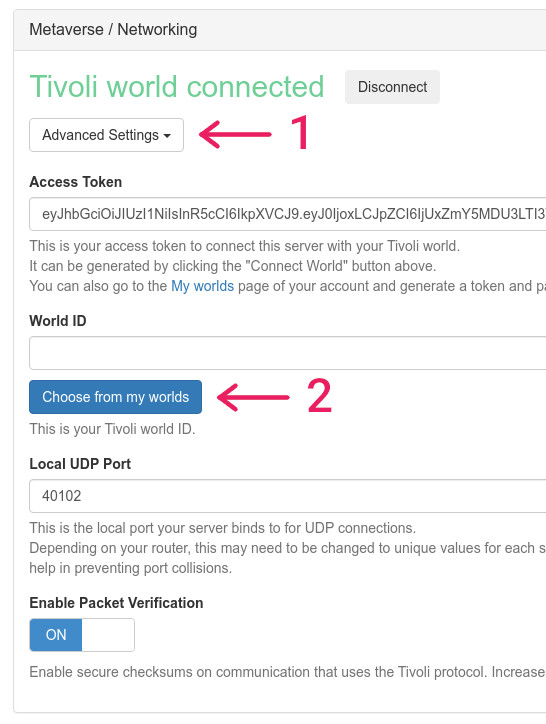
- You will now find yourself in the admin panel. In the settings page at the very top:

- Expand "Advanced Settings" and click "Choose from my worlds". Only one world will be available.
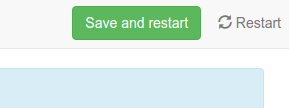
- Click "Save and restart":

-
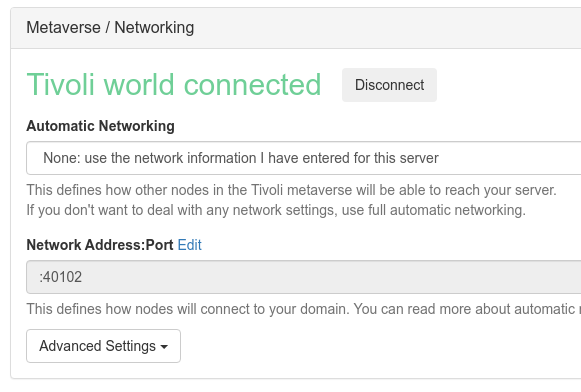
After the page has reloaded, you will now find:

-
Automatic Networking must be set to either:
-
Full: This doesn't require port forwarding. It will automatically establish a connection using the ICE protocol.
Warning
Whilst this is really convenient, keep in mind that this can cause connection problems. It's much more reliable to port forward and use the below instead.
-
IP Only: Just specify the port and it will work as a free DNS.
-
None: Where you specify a static external IP address and port.
- Network Address:Port or Network Port must be set accordingly. The port is set to
HIFI_DOMAIN_SERVER_PORTwhich is usually40102(+2 from the admin panel HTTP port)
Info
If Automatic Networking is not set to full, you'll have to make sure that these ports are open on your firewall or router for TCP and UDP:
40100-4011048000-48010
- Network Address:Port or Network Port must be set accordingly. The port is set to
-
- You will now find yourself in the admin panel. In the settings page at the very top:
Now that those settings have been set, everything should work!
5. Installation complete!
You can now find your world in https://tivolicloud.com/user/worlds which should indicate that there are 0 users. If it says Offline, then something went wrong.
You can always message us or the community for help on our Discord server. https://tivolicloud.com/discord
I hope this guide was useful to you and you can enjoy your own space in the metaverse!
Thank you for reading,
Maki